
How to Draw Lips

Grab your pencil and paper because you’re about to learn how to draw lips in this easy step-by-step drawing tutorial. I’ve made it beginner-friendly with simple, easy-to-follow steps that break the process down into bite-size pieces. You might be stepping in fresh, on your way to becoming an artist, or simply brushing up on your skills.
Regardless, this lip drawing tutorial is made with beginners in mind and keeps things as simple as possible. You’ll learn how to draw lips using pencil and basic techniques that help you create lips that look realistic—without the pressure of perfection.
Anytime you approach drawing faces, there are a lot of different angles, expressions, and poses you could explore. I don’t want to complicate things, so for this lip drawing tutorial, I’ll stick with steps for drawing a closed mouth from the frontal view. I’ll also briefly go over the structure to help you visualize the lips from different angles.
I’ll start with step-by-step photos and instructions, and when all is said and done, you’ll find a drawing video tutorial at the end. At some point, you may want to learn how to add detail to create a hyper-realistic drawing—and a tutorial for that will come in the future—but first, it’s important to learn how to draw lips, eyes, and other features using simple approaches to build a solid foundation.
If you're also interested in learning how to draw other facial features, take a peek at my how to draw eyes post. And if you’d like to stay updated on future drawing lessons, including that hyper-realistic lips guide, be sure to join the mailing list. I’m just beginning to post art tutorials, and I’d love for you to be part of this creative journey.
For this lip drawing tutorial, I recommend either an HB or 2B pencil as they're not too hard or too soft. You'll also want an eraser, and a blending stick. If you don't have a blending stick you can use your fingers or a q-tip. Now, let’s learn how to draw lips!
Simple Lip Structure
Before we jump into the actual drawing part of this tutorial, let’s take a moment to study the structure of the lips from different angles. When you break things down into simple shapes, it becomes much easier to visualize how everything fits together.
Below, I’ve sketched the lips from four views: at the top is the frontal view, followed by the 3/4 views (left and right), and at the bottom is the side profile.
Let’s start by looking at the sketches on the left side.
The long horizontal line in the center represents where the lips meet. At the top, you’ll see a circle—this marks the center of the upper lip, which tends to protrude more than the areas on either side.
You’ll also notice two side-by-side circles on the bottom lip. These represent the parts of the lower lip that typically push forward more than the rest.
Now look at the sketches on the right side. By using these simple circles as guides for the top and bottom of the lips, you can quickly build the basic shape with much more confidence and accuracy.

There’s a little more to it than that, though. When you turn to the side or view the lips from a 3/4 angle, the shape and placement of the circles change. As the lips shift away from you, the circles on the far side become narrower due to perspective.
I’ve drawn a red line down the center of the lips in the 3/4 view sketches, and you’ll notice that one side of the mouth is more visible than the other. Here are a few things to pay attention to:
The short side of the upper lip: the center of the circle is now off to the side, closer to the side that's further away. This makes sense—if you see less of one side of the mouth, you’ll also see less of that circle.
That also means you’ll see more of the other side—the side closest to you.
The same principle applies to the lower lip. The circle on the short side (the one furthest from you) will appear narrower than the circle on the side that's nearer. This shift helps give the lips a sense of depth and makes your drawing look more natural and realistic.
You may or may not see the corner of the mouth on the side furthest from you, and this is because our faces are curved. So the lips curve along with it.

How to Draw Lips Step-by-Step
Here’s how to draw lips:
Start by drawing a straight horizontal line, then cap both ends with thin sesame seed shapes. This gives you the basic length and corners of the mouth. Mark the center point of the line—this will help you keep everything balanced.
Next, decide how thick you want the upper and lower lips to be. Lightly place a mark above the line for the top lip and one below the line for the bottom lip.
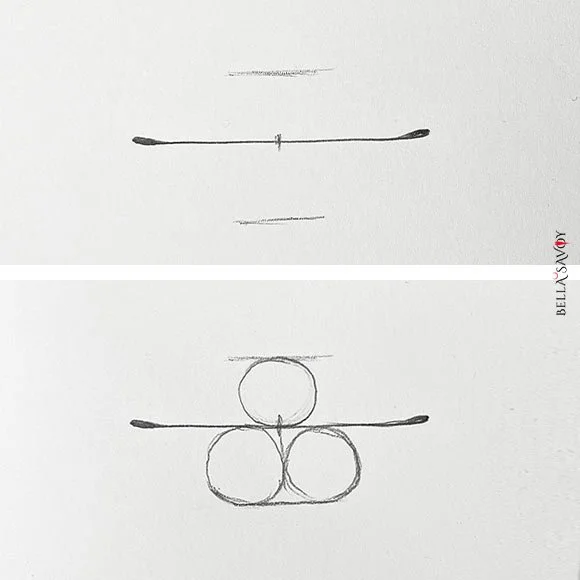
Next, draw one circle above the center line (this will help form the upper lip) and two circles below the center line for the lower lip. It can also be one wide oval instead of circles. Both will work.
To draw the upper lip, starting with where the lips meet. Start with a small curved line in the center, using the bottom of the circle as your guide. From each end of that curve, draw a line that extends outward toward the corners of the mouth. This will form the natural contour of the upper lip. If you analyze what you just drew you’ll be able to see the letter 'M' that’s been stretched wide.
The top of the upper lip is also a stretched letter ‘M’ with the ends curving down towards the corners of the mouth. Since this area sees more light, sketch this in lightly.

Draw the bottom lip: use the lower circles as a guide and lightly sketch the shape of the lower lip. Leave a small gap just before you reach the corners of the mouth—this helps the lips look more natural and less stiff.
Learning how to draw lips is just on part of this drawing tutorial. You'll also need to learn how to shade them in. I recommend using pencil lead that isn’t too hard or too soft, like HB. This will help you blend your marks without too much difficulty or mess.
Start by shading the upper lip and the center of the lower lip. Lay the shading down fairly evenly, but make it slightly darker where the lips meet.

Use a q-tip, blending stick, or your finger to blend your shading.
Then using a q-tip or blending stick to blend it even further and to create some shadows. Since your lips curve in where they meet at the opening, there will be a shadow.
Push your blending stick a bit harder in this area and darken the shadows at the bottom of the top lip and the top of the bottom lip. Also add shadows at the bottom of the lower lip.
Also add a small shadow at the corners of the mouth.

Remember where we drew the circles at the beginning? The center of those areas should be a bit light as they protrude out and catch light.
Since your lower lip has volume there will be a shadow cast underneath. Use your blending stick to add it it.
Tip: You can also use your blending stick to lightly create a few natural lip lines—just drag it gently in the direction the lips curve.
Now for some subtle highlights—grab your kneaded eraser and shape it into a fine point. Gently lift some of the shading along the bottom of the lower lip and within the center of both the upper and lower lips. These highlights will help bring your lips to life and make them look more three-dimensional.
Now that you’ve followed along and learned how to draw lips step by step, don’t stop there—practice really is the best way to improve. If you’re looking for inspiration or want to try drawing lips from different angles, check out my Pinterest board full of drawing references for lips. You’ll find a mix of expressions, lighting, and styles to sketch from at your own pace.
And if you haven’t already, be sure to visit my eye drawing tutorial. Honestly, learning how to draw eyes is a great companion to this post and helps round out your skills when it comes to drawing faces.
If you’d like to get updates when I post new drawing lessons, don’t forget to sign up for the mailing list. I’ll send you a quick note when new tutorials go live, and you’ll also get access to cute coloring pages from time to time—just little moments of calm you can enjoy without worrying about accuracy or perfection. Sometimes it’s fun (and important) to just let loose and enjoy the process.
Thanks for drawing with me today! I hope you enjoyed this lip drawing tutorial — happy sketching and see you in the next drawing lesson!