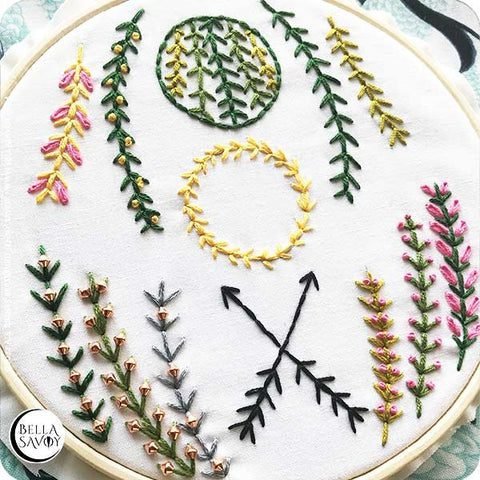
🖤 Use this easy fern stitch embroidery stitch to create lots of beautiful design elements. It’s versatile and can be combined with other stitches like the lazy daisy stitch and French knots, or you can even add beads to spice things up and elevate your design. This fern stitch tutorial will guide you through how to master this technique so you can incorporate it into your projects with ease.
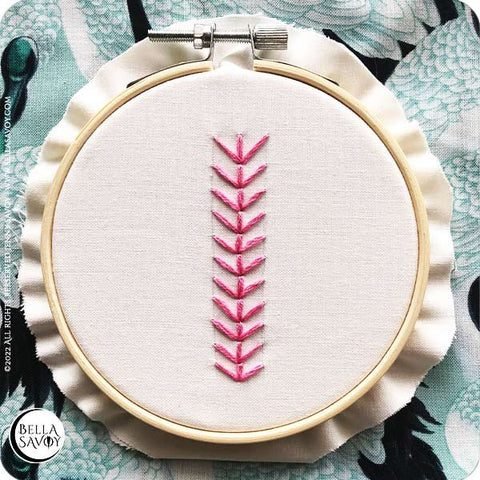
As the name suggests, the fern stitch resembles a fern leaf and looks much like the long tail fly stitch stacked on top of each other. It’s perfect for creating plants, hanging vines, borders, or even the fletching of an arrow. You can also use it for open fills or any design element that needs a bit of texture and depth. This is a great stitch to add to your repertoire, especially if you’re looking for something easy yet impactful. Whether you’re working on a cozy hobby or new embroidery project, the fern stitch will bring a beautiful, organic touch to your work.
Table of Contents
There’s more than one way to create this easy embroidery stitch, and both methods are simple to learn. I’ll walk you through each technique so you can choose the one that works best for your project.
Video: Fern Stitch Method One
-
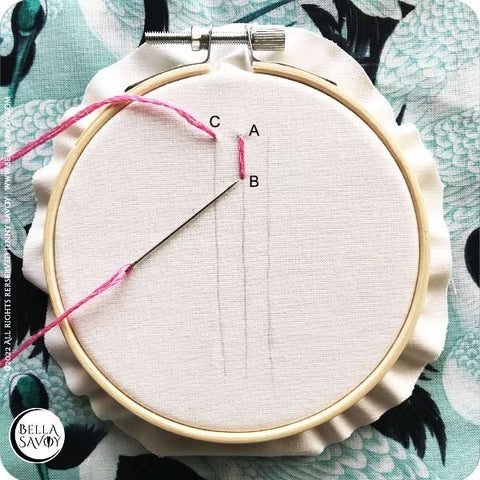
Add 3 vertical parallel guidelines.
-
Make a single stitch at the top of the center guideline. (A to B)
-
Come up at the top of the 1st guideline. (C)
Return to the back at the bottom of the center stitch to create a 45° angle. (B)
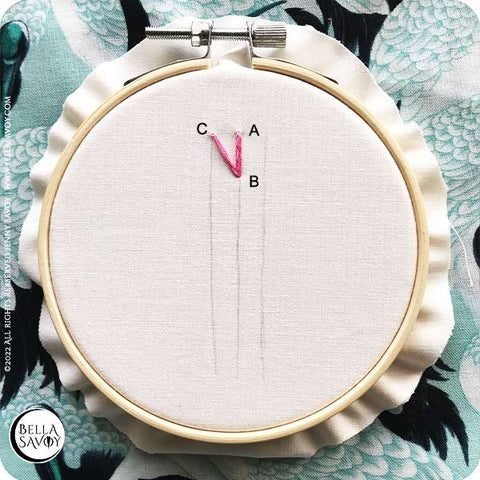
Do the same on the other side.
-
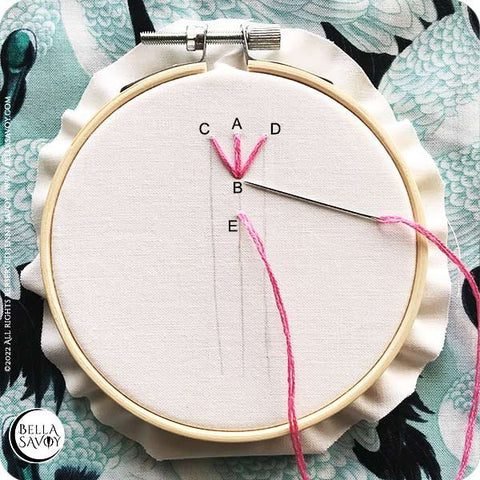
Come up at the top of the 3rd guideline. (D)
-
Return to the back at B.
-
Come up along the center at E and return to B to make another single stitch.
Now repeat the steps down your guide lines until you’re happy with the length.
Video: Fern Stitch Method Two
The second method begins by creating a back stitch along the center guideline, which will serve as the foundation for your fern stitch. Once this is in place, you can easily build the fern shape with the following steps.
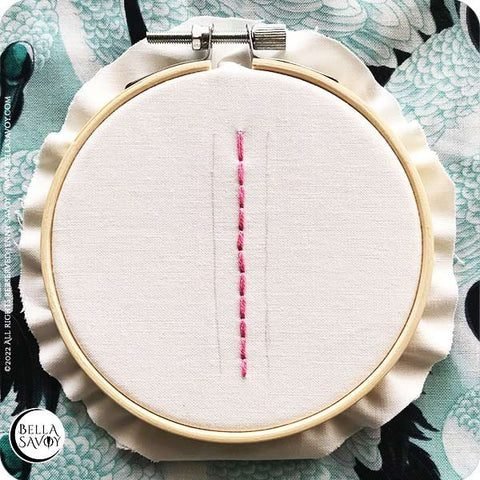
From here, add your 45° angles on each side using straight stitches.
Creative Uses
The fern stitch can certainly be created along straight guidelines, but it truly shines when worked along curved lines, as this gives it a more natural, organic look. Experiment with creating circles, ovals, or even vines to add fluidity and charm to your design.
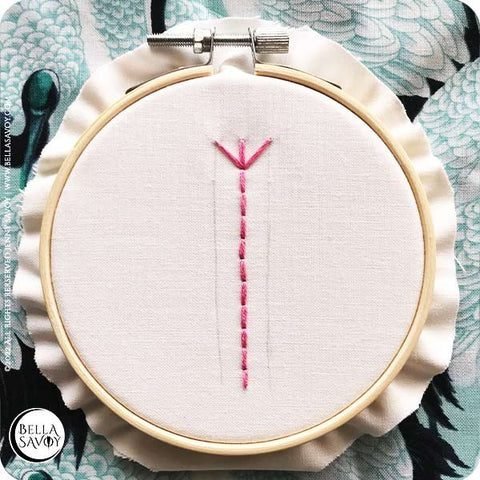
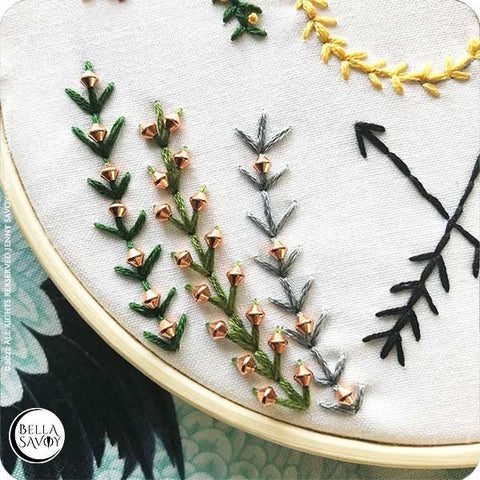
Create arrows by simply adding a back stitch (or even an outline stitch) between the arrow point and the fletching. The fern stitch can also be used to create lovely borders, accents, and even open fills to add depth to your designs. They’re perfect for crafting bits of foliage, such as leaves and vines, which can really enhance the overall design. When combined with other easy stitches like the French knot or lazy daisy stitch, these elements create beautiful, intricate designs that bring a fresh, natural feel to any project.
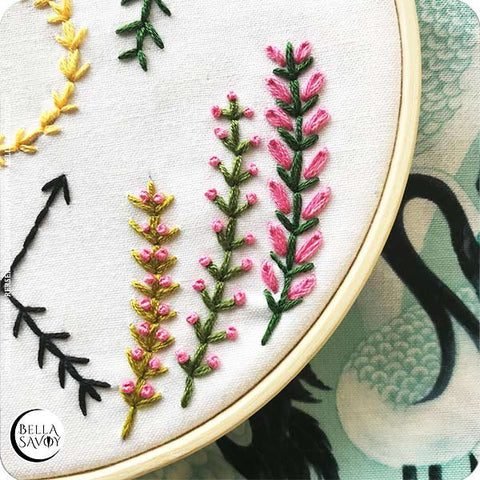
Add Beads
If you want to add a little sparkle to your stitch, simply thread a few beads as you go along. Choose any beads that catch your eye – I used some copper beads I had in my stash. You can add them to the center, along the sides, or place them wherever your creativity takes you. Feel free to experiment and be playful with their placement, allowing the beads to add a fun, personalized touch to your design.
I hope you enjoyed this fern stitch tutorial and that it inspires you to create your own beautiful, nature-inspired designs. Whether you’re adding a touch of greenery to your embroidery or combining it with other stitches like the lazy daisy or French knot, the fern stitch can bring your projects to life with texture and charm. Remember, there’s no limit to the ways you can incorporate this stitch into your work — try using it for borders, accents, or even delicate foliage designs!
Embracing cozy hobbies like embroidery is a wonderful way to unwind, relieve stress, and practice self-care. As you work with the fern stitch, let yourself relax and enjoy the process. Creating something with your hands can be incredibly rewarding for both your mind and soul, offering a calming break from the hustle and bustle of daily life. So, grab your needle, thread, and a cup of tea, and get stitching!
Video: Fern Stitch Tutorial
Enjoy the video tutorial below, where I walk you through both methods of the fern stitch covered above.